Sniff is a "Scratch-like" programming language that's designed to help Scratchers move gently from Scratch to more conventional languages. They can start writing programs, without having to learn a new language because Sniff is based on Scratch. They learn a little more about variables, compiling, syntax errors (!), and they can have fun controlling real hardware while they're doing it.

Thursday, 21 January 2016

Bitmaps and Sounds on the Gameboy Advance

In the last post we covered basic drawing on the Gameboy Advance screen using Sniff. That works fine, but at some point you'll probably want to make some "real" artwork, as a bitmap, and draw it on the screen. You might also want to add sound. Both of these are pretty easy if you're familiar with Sniff on a PC, as there are GBA equivalents of the Sound and Bitmap devices.

We've covered these previously, but they're pretty easy to use. To draw a bitmap on the screen:


make display gbaScreen device 4
make displayX number
make displayY number

make img bitmap device
make fileData string

when start
.tell display to "clear"
.
.set fileData to "Castle.bmp"
.tell img to "load"
.set displayX to 100
.set displayY to 80
.tell img to "draw"


First we need too set up the graphics screen, so that we have somewhere to draw. Then create a bitmap device. Set the image name, and tell the bitmap to load it, and then we can draw it at specific coordinates on the screen.

There are a couple of differences between the Bitmap device on a computer and on the gameboy, but these probably shouldn't affect your games. Firstly the bitmap is "read only". For example in SniffPaint we actually create the contents of a bitmap device inside the program before saving it out. On GBA that's not possible due to the way data is stored. The other thing you can't do is rotate bitmaps. On a PC you can tell the bitmap to rotate, and draw it at a jaunty angle... On the GBA this was just too slow, and it was slowing down all of the drawing code, so we removed it. However in the next post we'll talk about sprites, which can do this super quick and easily!

Sounds work just the same way: 

make player sound device
make fileData string

when start
.set fileData to "WinSound.raw"
.tell player to "load sound"
.forever
..tell player to "play"
..wait 10 secs

They play 8 bit signed raw audio data at 16KHz Mono, but otherwise they behave just like on other platforms.

However there's one thing we've glossed over (and the reason I'm writing about both of these together)... On a PC the bitmap and the audio data get loaded from files, but the GBA is a games console - it doesn't have files, so where does the data come from?

It needs to be made into an "asset bundle" which gets added to your program. Fortunately we've got a bunch of scripts which make it really easy. In the folder your working in, create a folder called "Images" and put bmp files in there. Similarly create a "Sounds" folder and add ".raw" files containing the audio. Then in the main folder type "gbaBundleAssets". If all goes well this will create a file called "ASSETSBUNDLE", which will automatically be included in your game.

If you get an error about commands not being found then go to the folder examples/GBA/tools and run installIDE to compile and install the bitmap conversion tools, which are written in Sniff. These pre-process the images into the format needed for inclusion.

And that's all there is to drawing bitmaps and playing sounds on a Gameboy Advance.


Tuesday, 19 January 2016

Gameboy Advance Graphic modes in Sniff

A week or so ago we posted on how you could now make Sniff programs to run on the Gameboy Advance.While the hardware is a little old now, its a real console and running stuff on it is way more exciting than just drawing on a regular screen. So far we've just focused on getting stuff going, so today I'm going to start with some drawing code.

To draw on the GBA screen you need to use the gbaScreen device:

make display gbaScreen device 4
make displayX number
make displayY number
make displayColor number
make displayFlush boolean
make message string


Then you can use standard Sniff drawing operations to tell the screen what to do:

when start
.set displayColor to 777
.set displayX to 0
.set displayY to 0
.tell display to "move"
.set displayX to 100
.set displayY to 100
.tell display to "draw"

If you've not used these before, then you probably want to practice drawing on a PC screen first, before going to Gameboy. If you have used them, then they're exactly the same.

The new thing you do need to know about is that the the GBA has six different screen modes. Modes 0-2 are "tiled" modes, and while these are actually used for most real GBA games, they're a bit more tricky to understand, so we'll leave them for now. For regular drawing you need to use modes 3,4 or 5. Each has its own tradeoffs...

Mode 3 is 240x160 pixels with full colour. Unfortunately this uses up all of the GBA's graphics memory, which means it can't do double buffering or page flipping. In mode 3 the Sniff displayFlush has no effect, and all drawing goes directly to the screen, which means it can be very flickery unless you're careful.

To avoid flickering we need two screens worth of memory, and then we display one, while drawing to the other. Then we flip them over and all of our drawing appears instantly, without any flickering! Great, but we don't have enough memory for a full screen of full colour - something has to give:

Mode 4 is full resolution (240x160) but uses 8bits per pixel instead of 16. This isn't too bad, as Sniff generally uses a 9bit colour model(000-777). Unfortunatly this mode can also be a little slower due to the way the hardware handles memory.

Mode 5 keeps full colour but uses a lower resolution of only 160x128. Again we get the benefit of being able to keep two screens in memory, so we avoid flicker, but the low resolution looks a bit odd on screen.

Generally we like mode 4 the best, but you can run your code easily in any mode just by setting the parameter when you create the display device.

And that's all you need to know. You'll find examples of this kind of drawing in examples/GBA/window.sniff and there's GBA port of bounce out in examples/GBA/bounce.sniff

Sprites, Bitmaps, and Sound we'll save for another time.

Friday, 15 January 2016

LED Matrix Madness

I did a post a the end of last year on writing Flappy Bird in Sniff, to run an Arduino with an 8x8 led matrix screen. Following on from that I got very excited about the potential for running more complex games on such a simple screen. Having only 64 pixels to work with really focuses the gameplay and makes you think about every pixel. I started thinking of the possibility of designing a workshop session around these sort of games, and have a pretty near finalised design for a handheld "games console" that's easy to put together and is great fun to code for. However before I got to that stage I investigated lots of hardware options for what to use for the screen.

I started with a fairly common board with an 8x8 matrix of red leds driven by a max7912 chip. We already supported them in Sniff. Clk and Din connect to the SPI pins on an Arduino (or other controller), while you can connect CS to any control pin. Using SPI means it really only uses one pin (as the others can be shared), and its super fast, though as its only pushing out 8 bytes of data that's not really an issue (not worrying about drawing performance is a big win, as Arduino's struggle to push data out to bigger screens). What's especially nice is that you can daisy chain the boards, connecting the output from one to the input of the next to make a bigger display. Sniff is set up to handle up to four of these boards side by side - the shape of the board prevents them being stacked vertically.

To code for them just make a display device, and do some drawing:

make display maxMatrix device D10
make displayX number
make displayY number
make displayColor number

when start
.set displayColor to 000
.tell display to "clear"
.
.set displayColor to 700
.set displayX to 1
.set displayY to 1
.tell display to "move"
.set displayX to 8
.set displayY to 8
.tell display to "draw"

The pixels are numbered 1-8, rather than 0-7 as its really critical that you make every pixel count. Normally it doesn't matter than screens start at 0, but in this case numbering from 1 is more "Sniff like".

We were able to get recognisable versions of breakout, space invaders, snake, flappy bird, and most impressively defender running on this. It's a great board, and easy to find for under £2.


Working with these boards revealed that 8x8 was plenty of resolution to get some interesting game play, but trying to display multiple things on screen made them indistinct. It wasn't that we needed more pixels but that we couldn't distinguish what different pixels were supposed to be. For that reason we started looking into coloured displays.


The Colorduino is an all in one system, specifically designed to drive full colour an 8x8 rgb matrix with 8bit per channel colour depth (rather than just being on or off). The board is an arduino compatible, with headers laid out so that an rgb matrix drops straight on top of it. Shopping around I was able to get the board and a matrix for under £10, which is pretty reasonable (though i regularly encountered prices FAR higher that that). Not only is the display full colour , its huge - twice the height and width of the regular Max matrix.


To use it, just change the first line of the above code to:

make display colorduino device

and you're good to go. Compile and download using uno-sniff and it should just work like a normal Uno.

There's lots to like, but there are a couple of downsides. Most significantly is the limited I/O pins left available after the RGB matrix has been plugged in. On the side of the board are D0,D1,A4 and A5 (aka tx/rx and i2c data/clock). While this is a good selection it can be limiting. There's also no USB support on the board, so you need a USB/serial adapter to program it. These are only a couple of pounds and I keep a few around "for emergencies", so this should be no obstacle if you're using one for your own projects, I decided it was a bit fiddly for a workshop, as I didn't fancy getting a room full of kids to wire up serial pins compared to the simplicity of plugging in a USB cable. The extra cost also pushed it to the edge of what the budget for our workshops would allow.

Everyone loves neoPixels, and the only thing better than neoPixels is MORE netPixels arranged in an 8x8 grid. While these are expensive from mainstream suppliers, again we managed to find them for under £10. You'll need to add an Arduino to that, but they look amazing. Unfortunatly ours have got lost in the post, so we haven't been able to play with them yet. As soon as they arrive we'll have a device driver for them which lets you use them with the standard drawing commands, but for now you'll need to drive them using the standard ws2812 code.

As they're neoPixels these have the advantage of only using 2 pins on our controller, and are full colour. They're even BIGGER than the colorduino, which on the one hand is great, but they're perhaps getting a little too large (and expensive) for what we had in mind.


The final board gets back to the simplicity if the original Max single colour boards, but just steps it up a little. The tm1640 matrix is hard to find, but is available for about £4, and rather than being full colour, each of the pixels is a bi-colour LED - red and green. Each of the channels is a single bit, so they can be on or off, giving only four options: black, red, green and orange/yellow. However on my board the orange is a bit of a disappointment, being hard to distinguish from red. Despite that just having red and green opens up the options considerably, and everything looks really great. 

The other limitations on this board are that it has no mounting holes and the chip is on the bottom, making it hard to attach to stuff, and there's no through pins like the max, so you can't easily connect several of them to make a larger display.


The pins on the board are unlabelled, and it took us a while to confirm the pinout, but once we had that is an easy hookup - just power, data and clock. The board is smaller than the colorduino, but larger than the Max, making it a great size. Coding works exactly the same - just use:

make display tm1640Matrix device

All things considered this was our favourite board - just enough of a step up from the original red max matrix to be exciting, without being too big or expensive.

So here it is in operation in our Arduino powered handheld game console!


We went though a lot of iterations to the design before we end up with this which looks great, is fun to use and is cheap and simple enough that we can use them in our workshops. There's still a few small changes to make before its finalised, but we'll tell you more about it in another post.

Wednesday, 13 January 2016

Sniff on the Gameboy Advance

One of the things that we hear talking to teachers and kids is that they want to make "real" programs/games that run on actual game consoles and devices. While the GameBoy Advance is a little old now, but it fits the bill as a real commercial gaming device. As its a little older, it has the advantages of being cheap, well documented and its relatively easy to get code onto it, so now you can actually make your own game in Sniff, and download it into a cartridge, and the plug it into a GBA and have your own game running on a real device.


Assuming that you're already running Sniff, the next thing you'll need to do is install devkitARM. The instructions for this are a bit hit and miss, and are are directed more towards the Nintendo DS, but you just need to install the main devkitARM package and the libgba package and you're ready to go. Don't forget to set up the environment variables, as instructed on the dkARM install page.

With that done, go to the Sniff/examples/GBA folder, and we're ready to make a program.

make AButton digital input 0
make BButton digital input 1
make selectButton digital input 2
make startButton digital input 3
make rightButton digital input 4
make leftButton digital input 5
make upButton digital input 6
make downButton digital input 7
make leftShoulderButton digital input 9
make rightShoulderButton digital input 8

when start
.forever
..if AButton
...say "A"
..if BButton
...say "B"
..if startButton
...say "start"
..if selectButton
...say "select"
..wait 0.1 secs

All of the GBA buttons appear as digital inputs, so can read them easily. By default the GBA screen is set up in a simple text mode, so you can print things to it using "say". This isn't something you're going to use very much, but putting together the buttons, and "say" allows us to check that everything is working correctly.

You can compile this using the command "gba-sniff buttons.sniff" and you should get a file called buttons.gba which is an actual GBA rom image. The easiest  way to play it is to use an emulator - I used openEmu. That allows you to just fire up your ROM on you computer, and you can play it straight away.


However if you want the "real" experience you'll need a "flash cart". A few years ago everyone had one of these, and they were easy to get hold of, but they're a bit more obscure now. If you shop around you can get one, and then just copy your ROM onto an SD card, plug it into your GBA (or an original DS, which can play GBA carts), and you're instantly transported back to 2002.

There is third way which we're currently investigating... Floating around eBay and Aliexpress are handheld consoles that include a GBA emulator. These cost less that £20 and you can download your game straight into one of those via USB, and get a real handheld console experience. We've got one on order, and we'll report back when it arrives.

There's a lot more we need to say about using GBA graphics, sprites and sound - all of which are fully supported in Sniff. There's example code for using them all in the examples/GBA folder, and they work pretty much the same as they do on other Sniff devices, but I'll write more about them in a future blog post.

Tuesday, 12 January 2016

Measuring Cheese with the Esplora

One of the new features of Release 24 is support for the Arduino Esplora. This is essentially an Arduino Leonardo (so compile programs using leo-sniff), with a whole bunch of sensors, buttons, a joystick and a slider built onto the board, so you can start programming without having to hook up extra hardware. As such you could always compile programs to run on it using leo-sniff, but now we've added got hold of one we've added support for all of the sensors.


The foam is acting as a diffuser for the very bright RGB Led

make usb device
make usbConsole device

The main difference between the Esplora and the more common Uno is that they handle their usb communication to your computer completely differently. One the Uno there's a dedicated chip which does nothing but handle the USB, but on the Leonardo and Esplora this is all done in software. This is more flexible, but less reliable. If you have problems programming the board, then pressing the reset button just before you download the program will usually solve the problem.

We need to include the usb device to handle the core of the USB protocol, and then the usbConsole device so that "say" and "ask" get directed over the software USB implementation. These have been stable for some time, but we've recently seen some problems with OSX Mavericks. "ask" in particular seems to have become unreliable. Helpfully we'll get this resolved in the future.

Now for the interesting bits:

#Some of the HW is just atattched to pins:
make redLed analog output D5
make blueLed analog output D9
make greenLed analog output D10
make led digital output D13

when start
.forever
..set redLed to 0.5*((sin of (timer*100))+1)
..set greenLed to 0.5*((sin of (timer*110))+1)
..set blueLed to 0.5*((sin of (timer*120))+1)

The Esplora has a regular LED attached to D13 like most Arduino's but it also has an RGB led attached to pins 5,9 and 10. These support analog output so we have easily mix colours together.

make buzzer digital output D6


The buzzer is attached to pin D6. In fact the "buzzer" is simply a piezo speaker, and to play a sound we need to "push" the speaker in and out at specific speeds:

when start
.forever
...set buzzer to on
...wait 1000 microsecs
...set buzzer to off
...wait 1000 microsecs

There's an accelerometer attached to analog inputs (yes A11 is a real thing - not a typo), and a couple of spare pins D3, and D11 which are brought out on two "tinker kit" headers.

make accX analog input A5
make accY analog input A11
make accZ analog input A6

make tkOutA digital output D3
make tkOutB digital output D11

Though tkOutA and B are labelled as outputs they are direct pin connections and can be used as both inputs or outputs.

You can access all of the above using regular Sniff Arduino code, but the other hardware on the board is a bit more tricky, so we've bundled it up in the "esplora" device:

make esplora device
make temperature number
make joyX number
make joyY number
make joyButton boolean
make esploraSlider number
make esploraLight number
make esploraSound number
make switch1 boolean
make switch2 boolean
make switch3 boolean
make switch4 boolean
make tkInA number
make tkInB number

We've got access to the temperature (though in a previous post I expressed serious doubts about its accuracy) joystick, slider, light and sound levels, four switches and two generic tinker kit inputs (not that these ARE input only).

when start
.forever
..tell esplora to "read"
..say join [switch1] join ":" join [switch2] join ":" join [switch3] join ":" [s
witch4]
..say join "Temp:" [temperature]
..if joyButton
...say "Joy Pressed"
..say join "Joy:" join [joyX] join "," [joyY]
..say join "Slider:" [esploraSlider]
..say join "Light:" [esploraLight]
..say join "Sound:" [esploraSound]
..wait 1 secs


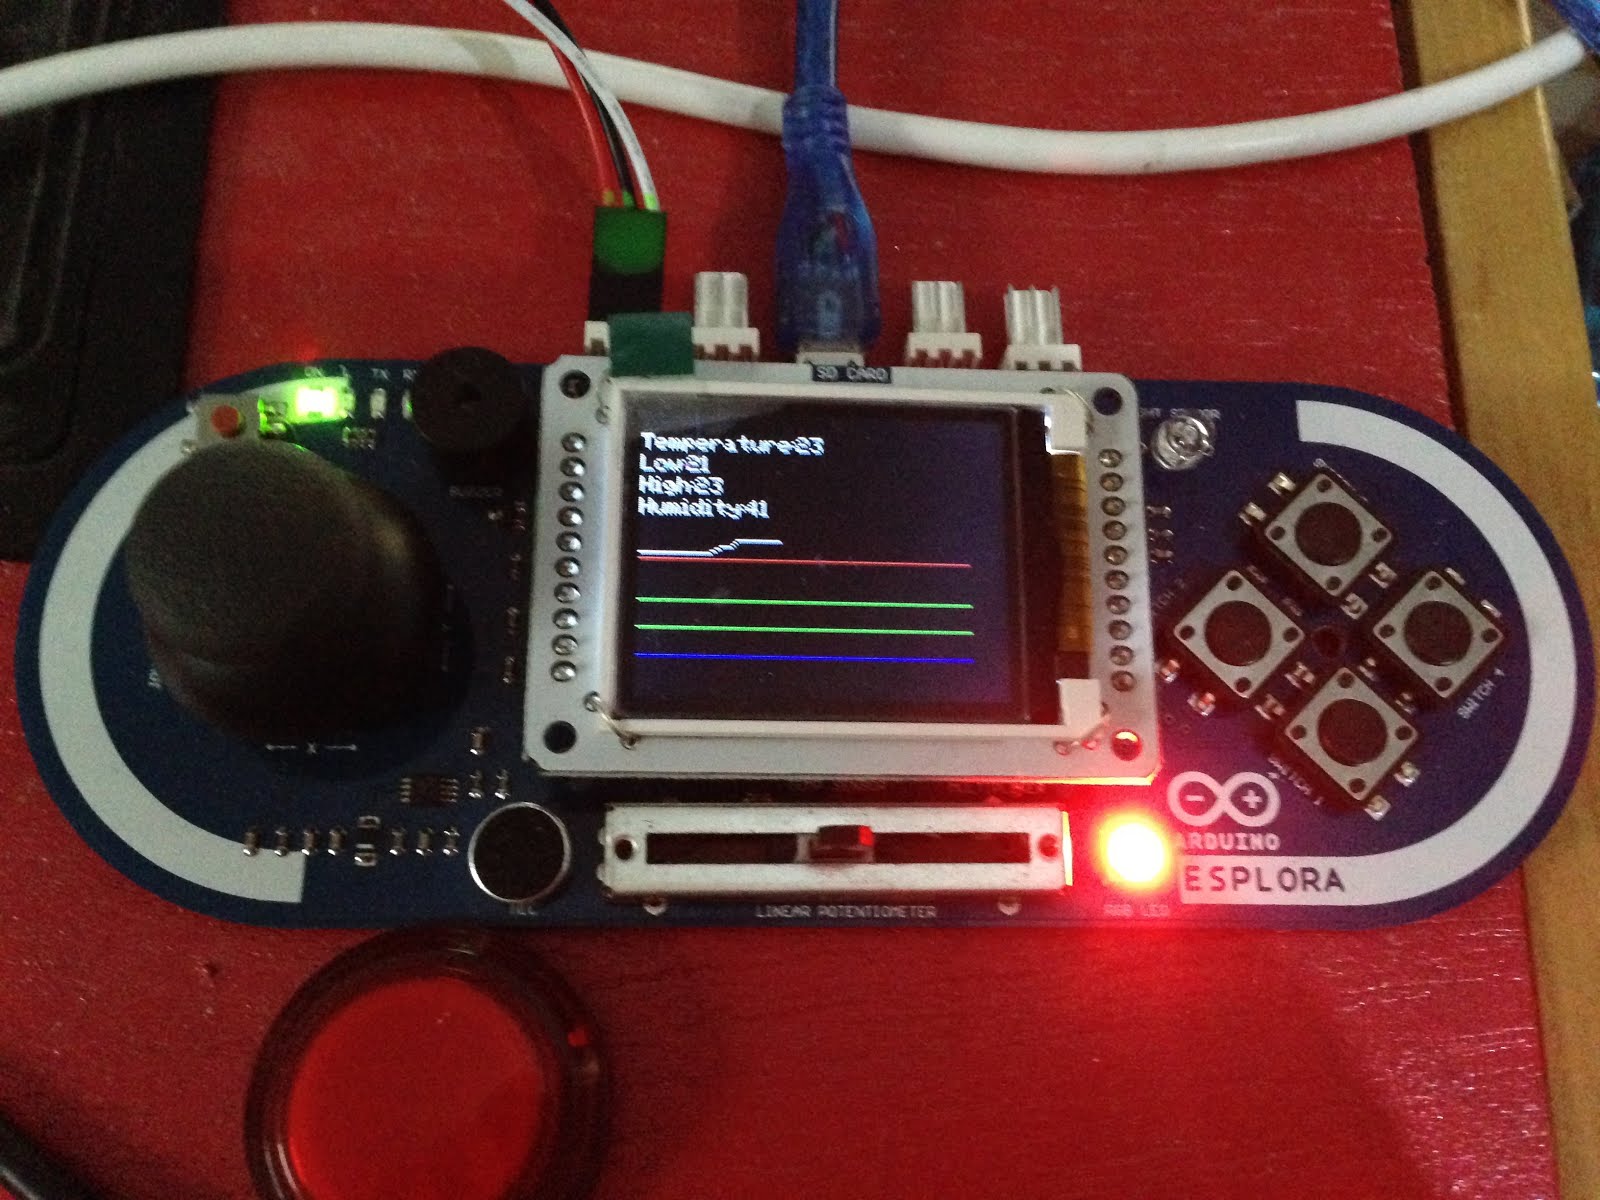
If you have the Esplora TFT screen you can also draw stuff on it, using the standard Sniff drawing methods, having first declared a display:

make spi device
make display esploraTFT device

With the basic stuff out of the way, lets actually do something useful with this...

 it's CHEESE TIME.

In addition to an Arduino Esplora, one of the residents of Snff Manor got a cheese making kit for Xmas. As I'm sure you all know, cheese needs to be matured in a cool place between 10 and 14 degrees. The cellars seemed ideal but some kind of monitoring system was clearly in order.


when start
.set maxTemp to -100
.set minTemp to 100
.
.set displayColor to 0000
.tell display to "clear"
.broadcast updateGraph and wait
.
.forever
..set slowAverage to 0
..repeat slowSampleTime
...set fastAverage to 0
...repeat 10
....tell explora to "read"
....change fastAverage by temperature
....wait 0.1 secs
...set temperature to fastAverage/10
...change slowAverage by temperature
...
...if temperature > maxTemp
....set maxTemp to temperature
...if temperature < minTemp
....set minTemp to temperature
...
...broadcast updateLed and wait
...broadcast updateText and wait
..
..set temperature to slowAverage/slowSampleTime
..add temperature to history
..repeat until not length of history>historyLength
...delete item 1 of history
...
..broadcast updateGraph and wait


There's a lot going on here, but if we start from the middle, you'll see that we repeat 10 times, measuring the temperature and averaging it over 1 second. This makes the built in sensor much more consistent (if not more accurate). Then we compare the measured temperature to the max and minimum, and fire off a couple of scripts to update the RGB led and some text on the display.

We do this 900 times, which is 15 minutes, and calculate an average over this longer period, which we add to a list called "history". This records the last 12 hours of data, and we call a script to plot it on the screen.

make lowestThresholdTemp number 6
make lowThresholdTemp number 10
make highThresholdTemp number 14
make highestThresholdTemp number 20

when updateLed
.if temperature <lowestThresholdTemp
..set blueLed to 1
..set greenLed to 0
..set redLed to 0
..stop script
.
.if temperature <lowThresholdTemp
..set blueLed to ((lowThresholdTemp-temperature)/(lowThresholdTemp-lowestThresholdTemp))
..set greenLed to 1-((lowThresholdTemp-temperature)/(lowThresholdTemp-lowestThresholdTemp))
..set redLed to 0
..stop script
.
.if temperature <highThresholdTemp
..set blueLed to 0
..set greenLed to 1
..set redLed to 0
..stop script
.
.if temperature <highestThresholdTemp
..set blueLed to 0
..set greenLed to ((highestThresholdTemp-temperature)/(highestThresholdTemp-highThresholdTemp))
..set redLed to 1-((highestThresholdTemp-temperature)/(highestThresholdTemp-highThresholdTemp))
..stop script
.
.set blueLed to 0
.set greenLed to 0
.set redLed to 1

I've set up four constants using the new Sniff R24 syntax. lowestThresholdTemp is 6, and using the word is exactly the same as using the number. This means we can push these definitions outside the code itself so if we need to change them, then we can see exactly where they need to be tweaked. In this first run, I've decided that the cheese should ideally be kept between 10 and 14, with a less ideal window of between 6 and 20.

When updateLED runs, it sets the RGB LED to blue if the cheese cave (thats what they call it!) is too cold, it then blends from blue to green as it warms up. When it reaches 10degrees it turns green. From 14 upwards it then starts turning red.


The TFT display on the Esplora is a really nice display. Unfortunately in some respects its too nice. Usually we use something like a Nokia5110 screen which is low resolution and each pixel is either on or off. Here we've got much higher resolution and full colour, which creates a real problem for us. With the smaller screens we can prepare the screen image in memory then push it out in a single blast, which minimises flicker. Here the screen is way to large to fit in the Arduino's minimal RAM, so we have to draw directly to the screen. Not only is this slower, but it means when we clear the screen to draw on it, the screen actually goes blank. Large amounts of flicker are unavoidable. To minimise it as best we can we're not going to clear the whole screen at once but rather clear off bits of it before redrawing:

make counter number
make minY number
make maxY number
when partialClear
.set displayColor to 000
.repeat (maxY-minY) using counter
..set displayY to minY-1+counter
..set displayX to 0
..tell display to "move"
..set displayX to 160
..tell display to "hfill"

when updateText
.set minY to 110
.set maxY to 118
.broadcast partialClear and wait
.set displayColor to 777
.set displayX to 0
.set displayY to minY
.set message to join "Temperature:" [temperature]
.tell display to "show"
.
.set minY to 100
.set maxY to 108
.broadcast partialClear and wait
.set displayColor to 777
.set displayX to 0
.set displayY to minY
.set message to join "Low:" [minTemp]
.tell display to "show"
.
.set minY to 90
.set maxY to 98
.broadcast partialClear and wait
.set displayColor to 777
.set displayX to 0
.set displayY to minY
.set message to join "High:" [maxTemp]
.tell display to "show"

The text is 8 characters high, so we use PartialClear to clear only the rows we're about to print on. Then we tell the screen to show the latest statistics.


when updateGraph
.set minY to (minTemp-graphOffset)*graphYscale-1
.set maxY to (maxTemp-graphOffset)*graphYscale+1
.broadcast partialClear and wait
.set displayColor to 007
.set displayY to (lowestThresholdTemp-graphOffset)*graphYscale
.set displayX to 0
.tell display to "move"
.set displayX to historyLength*graphXscale
.tell display to "hfill"
.
.set displayColor to 070
.set displayY to (lowThresholdTemp-graphOffset)*graphYscale
.set displayX to 0
.tell display to "move"
.set displayX to historyLength*graphXscale
.tell display to "hfill"
.
.set displayColor to 070
.set displayY to (highThresholdTemp-graphOffset)*graphYscale
.set displayX to 0
.tell display to "move"
.set displayX to historyLength*graphXscale
.tell display to "hfill"
.
.set displayColor to 700
.set displayY to (highestThresholdTemp-graphOffset)*graphYscale
.set displayX to 0
.tell display to "move"
.set displayX to historyLength*graphXscale
.tell display to "hfill"
.
.set displayColor to 777
.set displayX to 0
.set displayY to ((item 1 of history)-graphOffset)*graphYscale
.tell display to "move"
.repeat length of history using counter
..set displayX to counter*graphXscale
..set displayY to ((item counter of history)-graphOffset)*graphYscale
..tell display to "draw"

Finally we draw the graph, again using PartialClear to get rid of only the bit we need to. There are 4 horizontal lines on the graph, representing the 4 threshold temperatures, then we simply loop over "history" drawing the graph.

We placed this down in the cellars and were able to monitor temperature, and see how it varied. The graph was particularly handy, as it was able to reveal some large changes of temperature that happened when we weren't actually there.

As we had reservations about the accuracy of the Esplora's temperature sensor, we also attached a dht11 to on of the tinker kit outputs. Things still to do include logging data to the SD card, and sounding an alarm if the temperature gets to high - "quickly! To the Cheese Cave!!!!!"


Release 24: Flotilla, Esplora and Gameboy!

We try and keep Sniff releases lightweight and frequent, pushing out small updates once every month or so, but Release 24 got a little bogged down in its own awesomeness. It started out with some improvements to SniffPad to make the formatting a little clearer, but then we started work on something really exciting...

We ported Sniff so that it runs on GameBoy Advance! Not only did we port the basic code, and add graphics drivers but we ported the complete sprite library to run directly using the GBA's hardware sprites, so you can take games you've written using the "Hosted" version of the Sprite device, and they run with only minor modifications on a real commercial games console! If you've got a "Flash Cart" you can your run game on the real device, or you can just test in an emulator. We'll have a post in the next few days to document how to set everything up and get going.

The Gameboy work was going well, when the Flotilla arrived in the post... Super excited, we immediately got down to reverse engineering it, and got it running in Sniff. We've already done a few posts, and released a preview version of the Flotilla code, but its now integrated into this release. We've also added support for "Slider" and "Dial" - these are untested, as we don't have them yet, but they're simple enough that they should work.

As if that wasn't enough, we got our hands on an Arduino Esplora. This is technically the same as a Leonardo, so there wasn't any low level work to be done, but we've added an "Esplora" device which lets you read all of the sensors on the board in Sniff. Again we'll post details of this over the next week, but the code and examples are all included.

There are also a few more subtle tweaks and features we've added: We noticed in quite a few of the examples we were declaring variables which were essentially constants, but that we had to make them as numbers, then assign to them. Instead now you can assign a constant value to a number when you create it:

make gravity number 9.81
make maxWidth number 640

If you do this the value can never be changed. While this is slightly different to the way it works (for example) in C, but we think it makes more sense.

The other neat language feature is that you can now access command line args, so for example Sniffpad can take the name of a file to load:

make argv list of strings

when start
.if length of argv = 1
..set filename to item 1 of argv
.else
..set filename to "new"


As if that wasn't enough, as we were working on the GBA port, we refactored, and simplified the way the runtime handles ports, which should make the system more robust, and more portable in the future. You shouldn't notice this, though in the short term it might mean some of the more obscure ports are misbehaving. Let us know if you find any issues.

Wit that all behind us we can finally announce SNIFF RELEASE 24!

You can grab Release 24 from the Downloads page.

Thursday, 31 December 2015

The Esplora temperature sensor...

We got an Arduino Esplora for Xmas!! or more strictly a knock off copy. Official Esplora boards are way too expensive,  but copies are starting to appear, and for about £20 you can get a board, with a TFT screen included. We wasted no time getting everything working with Sniff, and we'll post details in a future post (once we've released the drivers in the next code batch). However its basically an Arduino Leonardo (use leo-sniff) with a bunch of sensors built into the board.

While overall we're fairly positive about the board, when we started coding for the temperature sensor, we ran into some problems, which might be of interest to others using the board.

The first thing we found was that readings were inconsistent and jumped around. A little research showed that this is a fundamental design problem with the Esplora.

The board uses a tmp36 and we can learn all about those from those helpful people at Adafruit. The great thing about the tmp36 is that it outputs a voltage dependant on temperature of between 0.2 and 1.75V over a range of -25 to 125 degrees. We can easily convert a given voltage to temperature using:

T=(1000V-500)/10

In other words the tmp36 is a solid, well thought out/built device that is well suited for many applications. However its inclusion in the Arduino isn't well thought out or well suited.

The AVR has a 10bit ADC, so when we apply a voltage to an analog pin we get an integer value:

A=(Vin/Vcc)*1024

Or to put it another way, our estimate of Vin is:

Vin=(A/1024)*Vcc

Dropping that in to the first equation gives:

T=Vcc*100*(A/1024)-50

and as Vcc is 5V

T=500*(A/1024)-50

which is exactly the equation you'll find inside the Esplora library. But here's the first real problem... What happens if we change A by 1? T changes by 500/1024 or about half a degree. The absolute  best we could hope for is that the temperature is going to change in half degree steps.

Now that would be OK in many cases - accurate to the nearest 1/2 degree over a range of -25 to 125 degrees is pretty impressive. The ds18b20 is a similar, or worse spec, and its great - I regularly drop it in coffee, or buckets of ice to see what happens. But the ds18b20 comes in a waterproof case on the end of a wire. The sensor on the Esplora is soldered to the board underneath the TFT screen. It's only going to measure air temperature in nice people friendly environments. Drop it in boiling water and you've got a bigger problem than half degree errors. Most of its life is going to between 20 and 25 degrees. Getting it wrong by 0.5 degrees is quite a lot when you'r only expecting a swing of 5 degrees anyway. Had the designers being paying attention to that graph on the Adafruit page they'd have noticed its got three lines on it, and the other two which represent the tmp34 and tmp35 are much steeper. In other words they give a bigger voltage swing for a given temperature change.With the tmp36, even in extremely hot or cold rooms we're never going to see more than a 0.1V swing, which the AVR ADC just isn't sensitive enough to measure well. They picked the wrong component for the job.

But things get worse... That half degree accuracy is only good if was assume our device is operating perfectly. A 10bit ADC might give you 10 bits of accuracy, but it probably won't. That last bit or two is going to wander around as it picks up noise from the surrounding circuits, so the reading jumps up and down by half a degree, essentially at random. Fortunately we can fix this by averaging the results. I averaged 10 results taken over 1 second and was able to get something fairly stable, and if the noise is truly random it can actually make the results a bit more accurate...

So wrote a demo app, averaging the temperature, which was reading a consistent 23 degrees and displaying it on the screen. Then I moved it to run from a USB PSU, rather than from the computer and the temperature reading dropped 5.5 degrees. Moving it back to the computer and it was high again. Moving it from the USB hub to being directly plugged in dropped it 5 degrees.

Going back to a previous version of our equation:

T=Vcc*100*(A/1024)-50

We simplified this using Vcc=5, because USB runs at 5V... except it doesn't. USB specifies a voltage between 4.75 and 5.25. There's always a margin of error, and its considered OK to have a value +-5%. That corresponds to a 5% swing in T+50, or about +- 4 degrees at room temperature.

Using a USB Voltage/Current meter I was able to measure my power sources, and found that my USB hub is borderline out of spec, giving a low voltage, and hence high temperature. Both the Mac port, and the USB battery are pretty close to being right on spec, but even the difference of 0.04V was enough to give a small change (after averaging).
USB hub: 4.7v 23.9C
Mac: 4.99v 18.8C
Battery 5.03V 18.3C

Unless you trust your power supply totally the sensor is accurate to with 4 degrees. Again that would be fine if we were measuring a range of temperatures, but as we're limited to measuring air temperature 4 degrees either way of a 22 degree reading is not knowing if its 18 degrees (put a jumper on) or 26 degrees (open a window).

At one point I was plotting the temperature on the screen and got a regular up/down cycle. It turned out my USB volt meter was dropping the voltage by a few mV every time it switched from volts to amps reading... enough to give a systematic temperature variation.

For reference I hooked up a dht11, and a ds18b20 to the tinker kit ports of the Esplora, and set it to display all three recorded temperatures. The DHT11 and ds18b20 produced different readings but they were consistent when I changed the power source. The DHT11 is known for being inaccurate, but if it constantly reads high (as mine seems to) then you can calibrate around it.


Now you might argue that its just a fun/toy beginners board and that it was built to a budget, but that doesn't hold water. For a start the official boards sell in kits for £70. Also while its pretty easy for me as an experienced engineer to deal with these issues, someone less experienced would just be sat with a gadget that didn't work reliably.

Perhaps the worst thing though is that there are other solutions out there that would do the job better and more cheaply. A tmp36 costs about £1 on eBay (pennies in bulk), but a thermistor costs pennies on eBay (decimal points in bulk). They provide similar accuracy but because you thermistors as a potential divider Vin is proportional to Vcc, which means that in the equations Vcc just cancels out.

The real ironic moment is when you realise they picked a component: the tmp36 that has as a design feature that Vout is independent to Vcc. The tmp36 behaves the same even if the voltage changes... which in this case directly leads to us getting the wrong results. It's not the tmp36's fault... They just picked the wrong component!