It's been a while, as I sort of got tied up in other things, but one of the devices that's been sitting on my desk for the last few months is a BBoard.
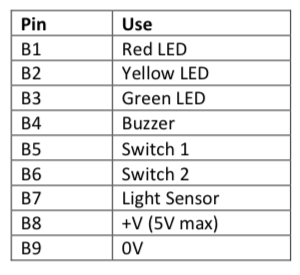
These little boards from Al's Tech Garage have three LED's, two switches, a buzzer and a light sensor, and are designed for plugging into Arduino's. They're pretty nice, though my one gripe would be that the Pins are labeled B1-9, rather than what they actually do, so you'll need to keep this handy table close to hand at all times:
I happen to know Al (of Al's Tech Garage) likes plugging them into Arduino Nano's because they're super cheap. If you're using a Nano, then you can plug them along one side of the board, and use the following Sniff declarations to set up the pins:
make pwr digital output D2
make button2 digital input D4
make button1 digital input D5
make buzzer digital output D6
make greenLight digital output D7
make amberLight digital output D8
make redLight digital output D9
when start
.set pwr to on
This is a little naughty as it uses D2 as the power supply, but the board draws sufficiently small amounts of power that it should be fine.
To plug in to an Uno then you can plug the board in with B1 into A5. You'll find that B7 (the light sensor) falls in the gap where the Arduino has no pins, but then B8 and B9 conveniently land in Vin and 0V. Strictly we shouldn't use Vin here, as if you're using a non-standard power supply it could be greater than 5V, but if you're powering over USB this works great. Of course we can't use the light sensor, but that's probably OK if you're getting started.
In fact the most obvious thing you'll want to do is make a traffic light! Yes - you've got three LED's of the right colours, a couple of buttons and a buzzer all ready to go. what else are you going to do? I've already written about implementing traffic lights a long time ago using the PiBrella. To make that work on the BBoard, just change the pin definitions to the above and you're good to go.
The next thing I wanted to build was a Theremin, using the light sensor to detect how far away my hand was. Unofrtunatly to make that work I couldn't use the "easy plug" method above, so had to use jumper cables to wire up the bboard as:
make light analog input A0
make buzzer digital output A1
make switch digital input A2
To make a sound with the buzzer we need to push it in and out (you can also use it with the Sniff music device, which is really cool, but we won't do that now). That's really easy:
make halfCycle number
make buzzerOn boolean
when start
.forever
..set buzzer to buzzerOn
..wait halfCycle microsecs
..set buzzer to off
..wait halfCycle microsecs
If buzzerOn is "off" then this does nothing. If buzzerOn is "on","yes", or "true" then this pushes the buzzer in and out, making a sound. The frequency is controlled by the variable halfCycle.
For a quick test we can just set the halfCycle something reasonable:
when start
.set halfCycle to 500000/440
440Hz is the standard frequency of the note A, which everything else tunes to. If something is oscillating 440 times per second then the duration of each pulse is 1/440. However we want half of that so we have 0.5/440. Finally we want the duration in microseconds, so we get 500000/440.
Once that was working I could rewrite to use the light sensor:
make frequency number
when start
.forever
..set buzzerOn to switch
..#say [light]
..set frequency to (light*220)+220
..set halfCycle to 500000/frequency
..wait 0.02 secs
the reading of the light sensor can be between 0 and 1, so we set the frequency to a value between 220 and 440Hz (one octave). Then calculate the halfFrequency. We do this 50 times a second, as that was sufficient to produce a smoothly changing note.
And that's it a BBoard Theremin! it works pretty well as long as there's plenty of light.

